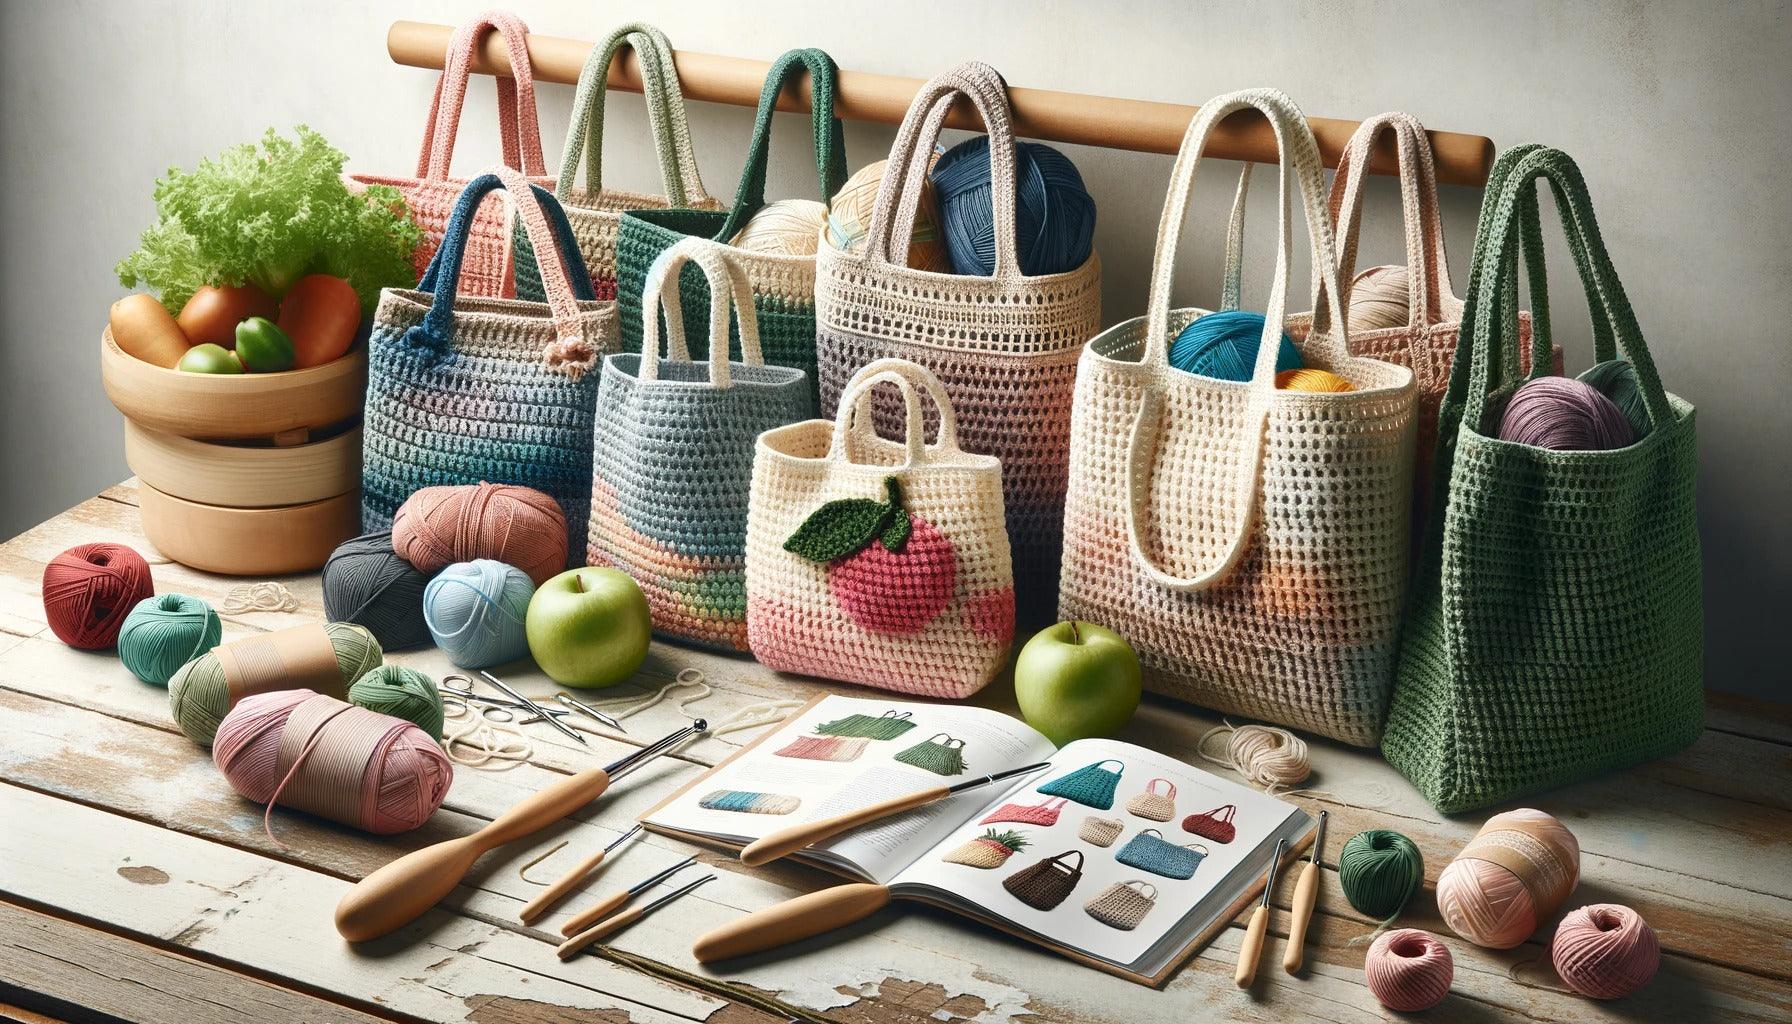
Introduction to Crocheting Reusable Bags
The art of crocheting opens up a world of creative possibilities. One such practical and eco-friendly project is learning how to crochet reusable bags. These bags are not only stylish and unique but also contribute to reducing plastic waste, a commendable step towards sustainability.
Why Crochet Reusable Bags?
Crocheting reusable bags offers several benefits. Firstly, they are a fantastic way to showcase your creativity and skills. Each bag you crochet can be a unique piece, customized with your choice of colors, patterns, and styles.
Secondly, these bags are highly durable and versatile. They can be used for grocery shopping, as a beach bag, or even as a trendy tote for daily use. Moreover, they are washable and reusable, making them an eco-friendly alternative to single-use plastic bags.
Lastly, crocheting reusable bags provides an excellent opportunity to hone your crocheting skills. Working on a bag project involves various techniques, such as crocheting in the round and learning to create strong, durable handles, that can elevate your crocheting skills.
What You Need to Know Before Starting
Before embarking on the journey to crochet a reusable bag, it's important to understand a few essential aspects.
Choosing the Right Material: The choice of yarn is crucial as it determines the strength and durability of the bag. Cotton yarn is a popular choice due to its strength, durability, and washability.
Understanding the Pattern: You should have a clear understanding of the bag pattern before starting. The pattern will guide you on the type of stitches used, how to create the base, body, and handles of the bag, and any special techniques involved.
Mastering the Essential Techniques: Familiarize yourself with the basic crochet stitches and techniques, such as slip stitch, single crochet, and double crochet. Also, learn how to crochet in the round, as most bag patterns require this technique.
Having the Right Tools: You'll need a crochet hook of the appropriate size, a pair of scissors, and a yarn needle for weaving in ends. For help with selecting the right hook size, check out our article on how to determine crochet hook sizes.
Starting a new crochet project is always exciting. With the right knowledge and preparation, you can create beautiful, reusable bags that reflect your style and contribute to sustainability. For beginners wanting to delve into this craft, our how to crochet for beginners guide provides a solid foundation in the basics of crocheting.
Understanding Crochet Techniques
The process of learning how to crochet reusable bags involves mastering a few key techniques. This section will guide you through the basic crochet stitches used in bag making, how to increase and decrease stitches, and the method of crocheting in the round.
Basic Crochet Stitches Used in Bag Making
There are several basic crochet stitches that are commonly used in the creation of reusable bags. These include the chain stitch (ch), single crochet (sc), and double crochet (dc). Each stitch contributes to the overall structure and design of the bag.
- The chain stitch forms the foundation row of your crochet work. It's the first stitch you'll learn in how to crochet and acts as the base for other stitches.
- The single crochet stitch is the simplest and most compact stitch, making it a good choice for bag bases or areas that need extra stability.
- The double crochet stitch is twice as tall as the single crochet stitch, allowing you to work up rows quickly for the body of the bag.
To master these stitches, take a look at our guide on how to crochet stitches.
Increasing and Decreasing Techniques
Increasing and decreasing in crochet is essential for shaping your reusable bag.
- Increasing involves working two or more stitches into one stitch from the previous row, effectively adding stitches to your work. This technique is often used when crocheting the base of the bag to create a flat circle.
- Decreasing is the process of turning two or more stitches from the previous row into one stitch, reducing the number of stitches in your work. While decreasing is less common in bag making, it can be used for shaping the bag handles or creating a tapered bag design.
How to Crochet in the Round
Crocheting in the round is a crucial skill for making reusable bags. This technique allows you to create a seamless tube of fabric, perfect for the cylindrical shape of a bag.
To crochet in the round, you'll start with a chain stitch loop, then work your stitches into this loop, building up rounds as you go. Each round is usually joined with a slip stitch into the first stitch of the round, and a new round is started with chain stitches.
For more detailed instructions on how to crochet in the round, check out our beginner's guide on how to crochet for beginners.
Mastering these techniques will equip you with the skills needed to create a variety of crochet projects, from simple how to crochet dishcloths to more complex designs like how to crochet baskets.
Crocheting the Bag Base
The foundation of a good crocheted bag lies in its base. A well-constructed base not only provides shape and stability but also sets the stage for the rest of the project. In this section, we'll discuss the crucial steps involved in crocheting the base of your reusable bag: selecting the right yarn and hook, starting with a magic circle, and expanding the base with increases.
Selecting the Right Yarn and Hook
The first step in crocheting a bag base is to choose the appropriate yarn and hook. The yarn should be durable and sturdy to ensure the bag can hold weight. Cotton or a cotton blend is often a good choice for its strength and washability.
The hook size largely depends on the yarn weight and the desired tightness of the stitches. A smaller hook will create tighter stitches, which can result in a more rigid bag. On the other hand, a larger hook will make looser stitches, making the bag more flexible.
| Yarn Weight | Suggested Hook Size |
|---|---|
| Light (DK) | 3.5 - 4.5 mm |
| Medium (Worsted) | 5 - 5.5 mm |
| Bulky | 6 - 8 mm |
For more information on hook sizes, refer to our article on how to determine crochet hook sizes.
Starting with a Magic Circle
Now that you have your yarn and hook, it's time to start crocheting. The base of a crochet bag usually starts with a magic circle, a technique that creates a tightly closed center. This is crucial to avoid any gaps in the bottom of your bag.
To make a magic circle, make a loop with your yarn, insert your hook, yarn over and pull through, then make a chain stitch to secure. This forms the center of your circle. You can then start crocheting into the circle according to your pattern. If you're new to crocheting, you might find our how to crochet for beginners guide helpful.
Expanding the Base with Increases
Once you have your magic circle, it's time to expand the base. This is done using increases, which essentially means making more than one stitch in the same spot. The number of increases per round will depend on your pattern, but a common method is to double the number of stitches in each round.
For example, if you start with 6 stitches in your magic circle, you would make 12 stitches in the next round (two in each stitch), then 24 in the following round (two in every other stitch), and so on. This creates a flat, circular base that gradually expands outward.
Understanding how to properly increase is a fundamental crochet skill. You can learn more about this and other techniques in our guide on how to crochet stitches.
With the right yarn, hook, and techniques, you can create a sturdy and functional base for your crocheted reusable bag. This provides a strong foundation for the rest of your project, setting you up for success as you continue to learn how to crochet reusable bags.
Working on the Bag Body
After crocheting the base of your reusable bag, the next step in learning how to crochet reusable bags involves creating the body of the bag. This section involves choosing the right stitch, maintaining consistent stitches, and determining the height of the bag.
Choosing the Right Stitch for the Body
When designing the body of a crocheted bag, the stitch you choose will have a significant impact on the bag's final look and durability. The choice of stitch can vary depending on the desired texture, the bag's purpose, and your own crochet experience.
For instance, if you want a tight, sturdy bag, you could opt for the single crochet stitch. For a more intricate design, you could choose a more complex stitch, like the shell stitch. Before starting, make sure you're comfortable with the stitch you've chosen by practicing it a few times. For a refresher on different crochet stitches, you can refer to our guide on how to crochet stitches.
Maintaining Consistent Stitches
Consistency is key when crocheting the body of the bag, as uneven stitches can impact the bag's overall appearance and function. To maintain consistent stitches:
- Ensure even tension: Too loose or too tight stitches can alter the bag's shape and size. Practice maintaining even tension throughout your work.
- Count your stitches: Regularly count your stitches to ensure that you're not adding or skipping any, which can alter the shape of your bag.
- Use stitch markers: These can be particularly helpful when working in the round, as they mark the beginning of each round and help you keep track of your progress.
Determining the Height of the Bag
The height of your crocheted bag largely depends on its intended use. For a small, handbag-style bag, you might crochet fewer rounds than you would for a large grocery bag.
To determine the height of the bag, continue to crochet in your chosen stitch pattern until the body reaches your desired height. It's important to remember that the bag's handles will add additional height, so consider this when determining how tall you want your bag to be.
By mastering these steps and techniques, you are well on your way to producing your own reusable crochet bag. Keep practicing and refining your skills, and don't be afraid to experiment with different stitches, patterns, and designs. For more in-depth crochet guides and projects, check out our other tutorials such as how to crochet market bags or how to crochet tote bags.
Creating the Bag Handles
Once the body of the bag is completed, the next step is creating the bag handles. The type of handles you choose to crochet can greatly impact the look and functionality of your bag. Let's explore the different styles of crochet bag handles and how you can ensure their durability and comfort.
Different Styles of Crochet Bag Handles
There are numerous styles of bag handles that you can crochet, each with its unique look and feel. Here are a few popular styles:
Single-Strap Handle: This style involves crocheting a single, long strap that can be worn over the shoulder. It's a versatile style that works well for both large and small bags.
Double-Strap Handle: This style features two shorter straps that are perfect for carrying in the hand or on the forearm.
Loop Handle: Loop handles are small, circular handles that are often found on clutch or handbag designs.
Braided Handle: For a more intricate look, you can braid multiple strands of yarn to create a sturdy and decorative handle.
Each style requires a different technique and pattern. For more detailed instructions on how to crochet these bag handles, check out our article on how to crochet bags.
| Style | Technique | Best For |
|---|---|---|
| Single-Strap Handle | Long, continuous crochet | Shoulder bags |
| Double-Strap Handle | Two shorter crochet pieces | Handbags, tote bags |
| Loop Handle | Small, circular crochet | Clutches, handbags |
| Braided Handle | Braiding multiple yarn strands | Decorative, sturdy handle designs |
Ensuring Durability and Comfort
Regardless of the style of handle you choose, it's important to ensure that they are both durable and comfortable to use. Here are a few tips to help you achieve this:
Choose the Right Yarn: The type of yarn you use can greatly impact the durability of your bag handles. Thicker yarns or those with a tighter twist tend to be more durable.
Reinforce Your Handles: Consider reinforcing your handles by crocheting over a cord or adding a fabric lining. This can help to prevent stretching and wear over time.
Test for Comfort: Before attaching your handles, test them for comfort. They should feel comfortable in your hand or on your shoulder and not cause any strain.
By following these tips, you'll be able to create handles that are not only functional and comfortable, but also add to the overall aesthetic of your crochet bag. Remember, part of learning how to crochet reusable bags is about experimenting with different techniques and styles, so don't be afraid to try something new.
Finishing Your Crocheted Reusable Bag
Once you have crocheted the body and handles of your bag, the final steps involve fastening off and weaving in ends, and then learning how to care for your crocheted bag. These steps are crucial in ensuring your crocheted reusable bag is sturdy, neat, and long-lasting.
Fastening Off and Weaving in Ends
Fastening off, also known as binding off, is the process of securing the final loop in your crochet piece to prevent unraveling. To fasten off, simply cut your yarn, leaving a tail of about 6 inches. Then, pull the tail through the last loop on your hook and tighten it.
Weaving in ends is the next step. This involves hiding the loose ends of your yarn within the stitches of your project for a neat appearance. Use a yarn needle to weave the tail back and forth through the stitches of your work. Be sure to change direction a couple of times to secure the tail. After weaving, trim off the excess yarn.
Caring for Your Crocheted Bag
Once you have completed your crocheted reusable bag, proper care is needed to ensure it maintains its shape and durability.
Hand washing is the best method to clean your crocheted bag. Use lukewarm water and a mild detergent. Soak the bag for about 15 minutes, then gently squeeze it without twisting or wringing. Rinse thoroughly, squeeze out excess water, and lay it flat to dry.
For maintenance, check the bag regularly for loose ends or stitches that may need repair.
Crocheting reusable bags is a fantastic way to reduce plastic waste while expressing your creativity. By following these steps, not only will you learn how to crochet reusable bags, but you'll also contribute to a more sustainable lifestyle. For more crochet project ideas and techniques, explore our collection of articles here.