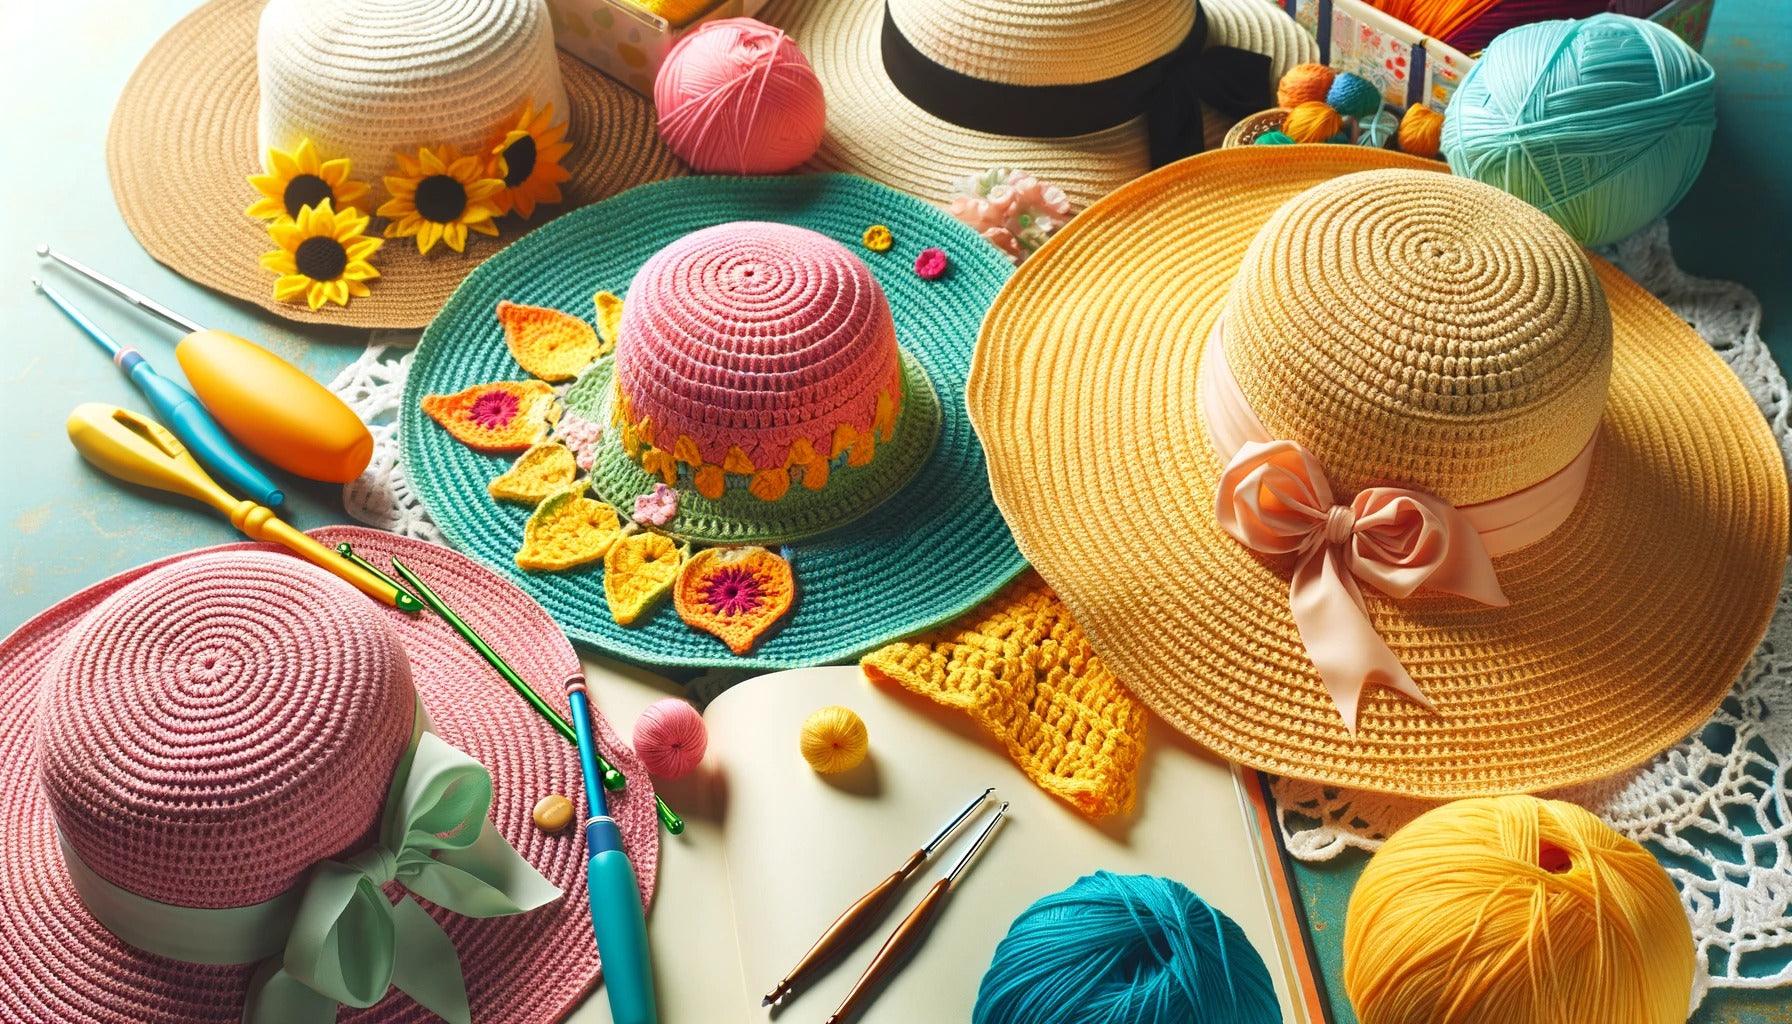
The Art of Crocheting Sun Hats
Crocheting is an art form that has been passed down through generations. It's a versatile craft that allows you to create a wide array of items, from scarves and blankets, to intricate amigurumi dolls. One such item that holds a special place in the heart of many crochet enthusiasts is the sun hat. In this section, we'll delve into why you should crochet your own sun hat and the basics of crochet techniques.
Why Crochet Your Own Sun Hat?
There are countless reasons why one might decide to crochet their own sun hat. It provides an opportunity to create something unique and personalized. You can choose your own color, pattern, and size, ensuring you end up with a hat that perfectly fits your head and suits your style.
Beyond the aesthetic aspect, crocheting your own sun hat is also a fantastic way to improve your crocheting skills. The process of creating a hat involves several different techniques, making it a great project for those looking to expand their crochet repertoire.
Moreover, there's a certain satisfaction that comes from wearing something you've crafted with your own hands. It's a testament to your skill and creativity, a tangible result of your hard work and dedication. For more reasons on why you should consider crocheting, check out our article on why crochet.
Understanding Basic Crochet Techniques
Before you can start crocheting a sun hat, it's essential to familiarize yourself with some basic crochet techniques. Here are a few fundamental techniques you'll need to understand:
Chain Stitch (ch): The foundation of most crochet projects, the chain stitch serves as the starting point from which other stitches are made.
Single Crochet (sc): This is the simplest and most basic of all crochet stitches, and forms a tight, dense fabric.
Double Crochet (dc): A taller stitch than the single crochet, the double crochet creates a looser fabric and is often used for creating patterns and designs.
Slip Stitch (sl st): This stitch is commonly used to join rounds or to finish off a project.
Magic Circle: This technique is often used when crocheting in the round, such as when starting a hat. It creates a tight circle with no hole in the center.
Increasing and Decreasing: These techniques are used to shape your crochet project. Increasing involves adding extra stitches, while decreasing involves reducing the number of stitches.
By mastering these fundamental techniques, you'll be well-equipped to start your journey of crocheting sun hats. If you're unfamiliar with any of these techniques, or need a refresher, check out our detailed guides on how to crochet and how to crochet stitches.
Remember, learning to crochet takes time and practice. Don't be discouraged if you don't get it right the first time. With patience and perseverance, you'll soon be able to create beautiful crochet sun hats.
Getting Started
Before embarking on the journey of learning how to crochet sun hats, it's essential to gather the right materials and understand the basics of crochet patterns. These initial steps lay the foundation for your crochet project and ensure a smoother crocheting experience.
Choosing Your Materials
The first step in any crochet project is selecting the appropriate materials. These primarily include the yarn and the crochet hook. When choosing yarn for crocheting sun hats, it's advisable to select a lightweight, breathable yarn that can comfortably withstand the heat. Cotton or bamboo yarns are often good choices for this purpose.
The size of the crochet hook to use largely depends on the type of yarn selected and the specific requirements of the crochet pattern. If you're unsure about the right crochet hook size for your project, refer to our guide on how to determine crochet hook sizes.
Understanding Crochet Patterns
Crochet patterns serve as the roadmap for your crochet project. They provide step-by-step instructions on how to create the desired crochet item. Understanding how to read and follow a crochet pattern is crucial for successful crocheting.
A typical crochet pattern includes a list of required materials, the type of stitches used, the gauge (number of stitches and rows in a specified measurement), and detailed instructions for each round or row. Some patterns may also include diagrams or charts to visually represent the pattern.
When starting out with crocheting sun hats, it's a good idea to begin with simpler patterns and gradually move on to more complex designs as your skills improve. Visit our guides on how to crochet and how to crochet stitches to learn more about the basics of crochet and crochet patterns.
Remember, the key to successful crocheting is practice and patience. With time, you'll gain confidence and mastery over different crochet techniques, enabling you to create beautiful, customized sun hats to shield from the summer sun.
Basic Hat Crocheting Techniques
To master how to crochet sun hats, it's essential to understand these three basic techniques: crocheting a circle, increasing and decreasing stitches, and crocheting the hat brim.
How to Crochet a Circle
Creating a perfect circle is the first step in crocheting a sun hat. Start with a slipknot, then create a chain of four stitches. Join the chain with a slip stitch to form a loop. For the first round, make a chain of three (counts as the first double crochet) and then add 11 more double crochets into the loop. Join the last stitch with the top of the chain of three using a slip stitch. To achieve a flat circle, you'll need to increase the number of stitches with each subsequent round. For an in-depth tutorial on crocheting circles, visit our article on how to crochet.
Increasing and Decreasing Stitches
Increasing and decreasing stitches is a crucial skill in crocheting a sun hat. Increasing helps widen the hat to fit the crown of the head, while decreasing helps taper it down to fit the sides of the head. To increase, simply make two stitches in one stitch from the previous round. To decrease, insert the hook into the next stitch, yarn over and pull through, then insert the hook into the following stitch, yarn over and pull through. Now, you should have three loops on your hook. Yarn over and pull through all three loops. For more on this technique, refer to our article on how to crochet stitches.
Crocheting the Hat Brim
The brim of the sun hat is typically larger and wider to provide sun protection. Once the body of the hat fits the head perfectly, it's time to start on the brim. Continue to increase stitches in each round to widen the brim. The number of rounds you crochet will determine the width of the brim. It's important to maintain a consistent tension to ensure that the brim lies flat and doesn't curl up.
In summary, these basic techniques are fundamental in learning how to crochet sun hats. With some practice and patience, you'll be able to create a beautiful and functional sun hat that's perfect for sunny days. For more complex patterns and techniques, explore our other articles on how to crochet patterns for hats. Remember, the key to successful crocheting lies in understanding the basics and practicing regularly. Happy crocheting!
Advanced Techniques for Sun Hats
Crafting your own sun hat can be an engaging and rewarding project. Once you have mastered the basics, you might want to explore advanced techniques to add a personal touch to your creations. In this section, we cover adding texture to your sun hat, crocheting decorative elements, and crocheting different brim styles.
Adding Texture to Your Sun Hat
Adding texture to a sun hat can make it visually appealing and unique. This can be achieved by alternating different types of stitches or incorporating special stitch patterns into your work.
For instance, using a combination of single and double crochet stitches can create a ribbed texture. On the other hand, incorporating a shell stitch or a puff stitch can create a more intricate, eye-catching pattern.
For a comprehensive guide on crochet stitches, please refer to our article on how to crochet stitches.
Crocheting Decorative Elements
Adding decorative elements to your sun hat can turn it from a functional object into a statement accessory. You can create various designs such as flowers, leaves, or even summer-themed motifs like seashells or starfish using crochet techniques.
These elements can be crocheted separately and then attached to the hat, or they can be incorporated into the hat as you crochet. Whichever method you choose, these elements can add a personal touch to your sun hat and make it truly one-of-a-kind.
Check out our guide on how to crochet flowers for a simple and beautiful decorative element to add to your sun hat.
Crocheting Different Brim Styles
The brim of the sun hat is not only essential for sun protection, but it also plays a significant role in determining the style of the hat. There are many different brim styles you can crochet, from wide and floppy brims for a boho-chic look, to short and stiff brims for a more classic design.
To crochet a wide brim, you will need to increase the number of stitches as you work your way out from the crown of the hat. For a stiffer brim, consider using a smaller crochet hook or a thicker yarn.
Remember, experimenting with different brim styles can give you a range of sun hats suitable for different occasions. Always keep in mind the final look you want to achieve while deciding the brim style.
For more information on different hat patterns, see our post on how to crochet patterns for hats.
By mastering these advanced techniques, you can craft a unique sun hat that reflects your personal style while providing sun protection. As always, the key to successful crocheting is practice and creativity. Happy crocheting!
Common Mistakes and How to Avoid Them
When learning how to crochet sun hats, it's common to encounter a few hurdles. Understanding these mistakes and knowing how to avoid them can be a game-changer in your crochet journey.
Incorrect Stitch Count
An incorrect stitch count can drastically alter the shape and size of your sun hat. This is often due to missing or adding extra stitches. To avoid this, ensure to count your stitches after every round. Keeping track of the stitch count helps maintain the correct size and shape of the hat. It's also beneficial to use a stitch marker at the beginning of each round to avoid confusion. For more tips on how to manage your stitches, check out our guide on how to crochet stitches.
Uneven Tension
Uneven tension results in a hat that's too tight or loose. This is often due to holding the yarn too tightly or loosely. Maintaining consistent tension is crucial for creating even stitches and a uniform hat. Practice makes perfect, the more you crochet, the more you'll be able to maintain a consistent tension. For beginners, it's recommended to start with simple projects like how to crochet dishcloths to practice maintaining even tension.
Misreading the Pattern
Misreading or misunderstanding the pattern can lead to mistakes in your project. This usually happens when you're not familiar with the abbreviations or instructions used in crochet patterns. To avoid this, familiarize yourself with common crochet terminology and symbols. It can be helpful to read through the entire pattern before starting and highlight any areas you don't understand. If you need a refresher on reading crochet patterns, we have a guide on how to crochet patterns for hats that can help.
By being mindful of these common mistakes, you can enhance your crochet skills and create beautiful sun hats. Remember, patience and practice are key when it comes to mastering the art of crochet. Happy crocheting!
Tips for Creating the Perfect Sun Hat
Crafting a crochet sun hat that is both beautiful and functional involves more than just understanding the basic techniques. The perfect sun hat should fit well, be made from suitable material, and have the right finishing touches. Here are some tips on how to crochet sun hats that stand out.
Getting the Right Fit
One of the most important aspects of crocheting a sun hat is ensuring a perfect fit. A hat that is too tight can be uncomfortable, while one that is too loose may not provide adequate sun protection. To ensure a good fit, you should measure the circumference of your head where the hat will sit. Use this measurement as a guide when following your crochet pattern.
Remember that different yarns can stretch with wear, so it may be beneficial to choose a hat size that is slightly smaller than your head measurement. Moreover, always make a gauge swatch before starting your project to make sure your stitch size matches the pattern. Check our guide on how to determine crochet hook sizes for more details.
Choosing the Right Yarn
The yarn you choose can significantly impact the look and feel of your sun hat. For a summer hat, it's best to opt for a yarn that is lightweight and breathable. Cotton yarn is an excellent choice as it is comfortable, absorbs moisture, and can be washed easily.
On the other hand, synthetic yarns like acrylic are durable and hold their shape well, making them ideal for hats with wide brims. Avoid using wool or other heavy yarns, as these can make your hat too warm for summer use.
Remember that the color of your yarn can also affect how much heat your hat absorbs. Lighter colors reflect more sunlight and are generally cooler than darker colors.
Finishing Touches for Your Sun Hat
The final touches can add a unique flair to your crochet sun hat. Consider adding a decorative edge to the brim, such as a scalloped or picot edge. You can also crochet a band to go around the base of the crown or add a ribbon for a touch of elegance.
Another idea is to crochet decorative elements like flowers or butterflies and attach them to your hat. If you're interested in learning how to crochet these elements, check out our guide on how to crochet flowers.
Lastly, don't forget to block your hat once it's finished. Blocking is a technique that involves wetting your hat and shaping it around a form to give it a professional, finished look. This step is especially important for sun hats, as it helps to stiffen the brim and keeps it from flopping down.
By following these tips, you can ensure that your crochet sun hat is comfortable, stylish, and perfect for sunny days. Remember, the key to a successful crochet project is patience and practice. Happy crocheting!