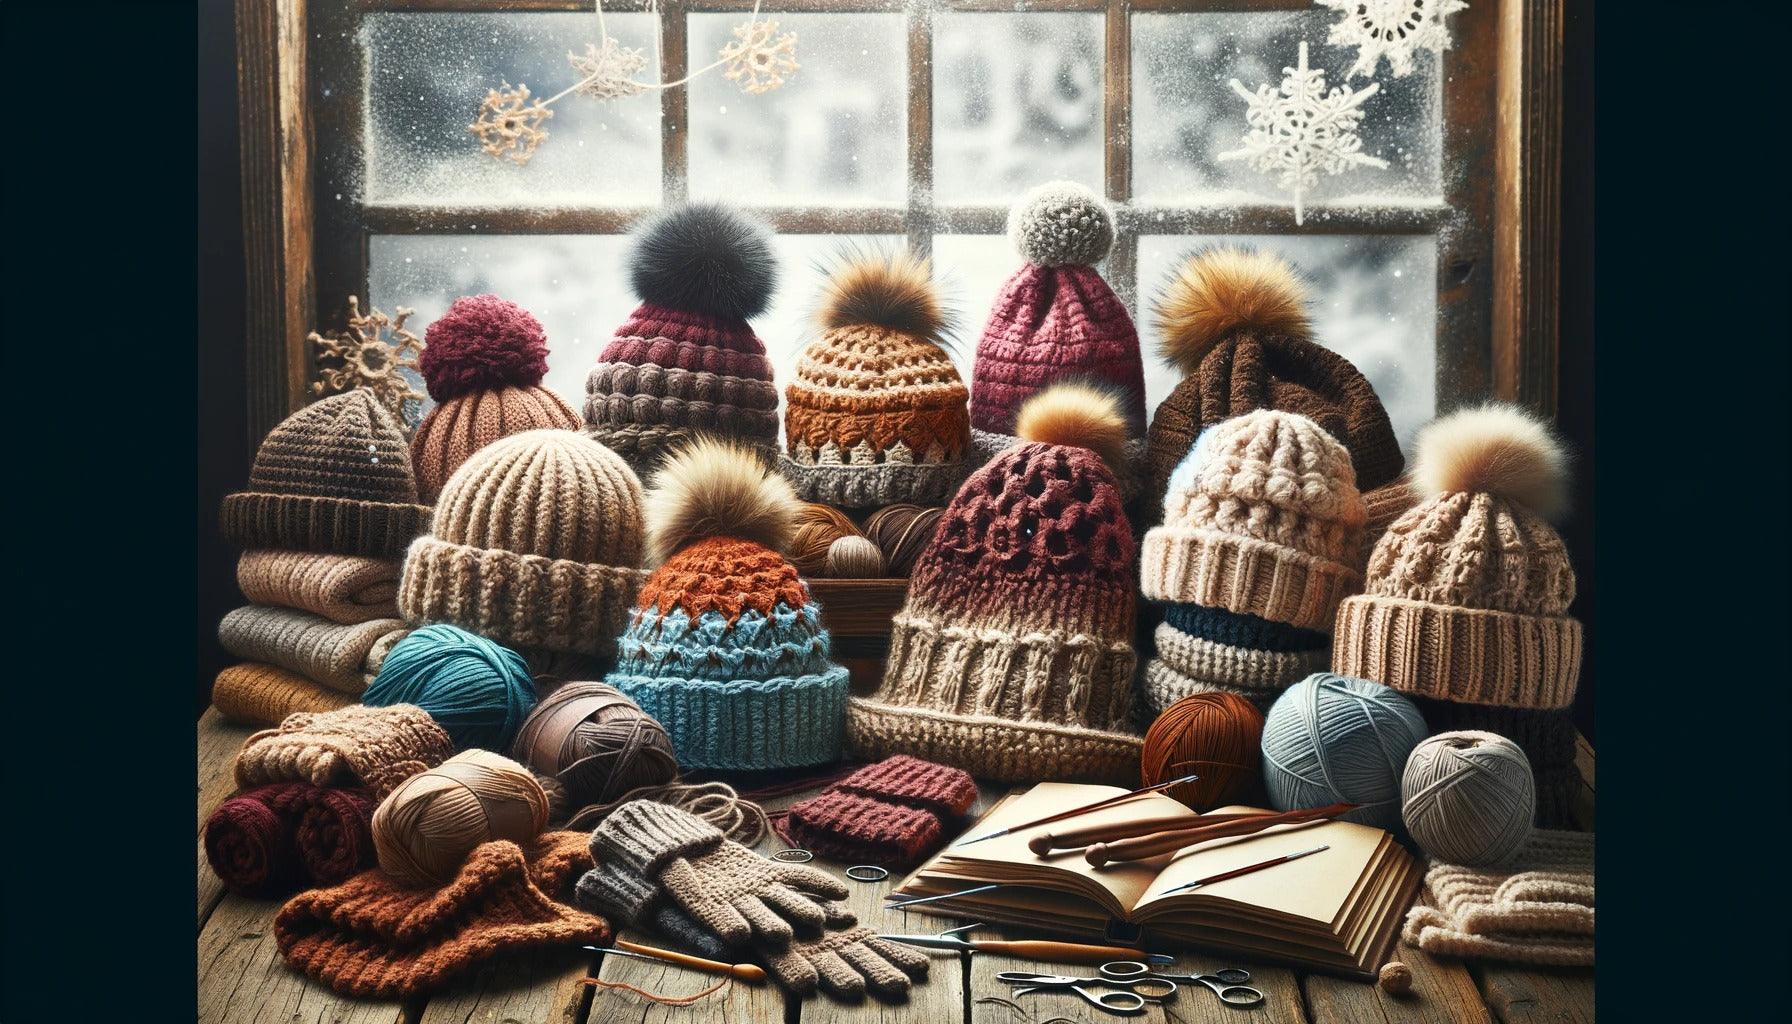
Introduction to Crocheting Winter Hats
As winter approaches, the allure of handcrafted accessories becomes even more appealing. Among these, crocheted winter hats stand out, not just for their warmth and style, but also for the enjoyment and satisfaction they bring to the process of creating them.
The Joy of Crocheting Your Own Winter Accessories
Crocheting your own winter accessories, including hats, provides a sense of accomplishment and allows for a high degree of personalization. You can select your own colors and patterns, adjust the size for a perfect fit, and even add unique embellishments. Moreover, a homemade crochet hat can make a thoughtful, heartwarming gift for loved ones.
Learning how to crochet winter hats can also be a fun and relaxing way to spend time indoors during the colder months. It offers a chance to cultivate new skills, express creativity, and even unwind as you immerse in this meditative craft.
Basics of Crocheting a Winter Hat
The process of crocheting a winter hat begins with understanding some basic crochet techniques and patterns. The hat is typically worked in rounds, starting from the top and expanding to achieve the necessary circumference, before decreasing to form the brim.
Some key crochet stitches often used in hat patterns include the chain stitch, single crochet, and double crochet. If you are new to crocheting, our articles on how to crochet and how to crochet stitches offer a comprehensive overview of these techniques.
It's also important to consider the type of yarn and the size of the crochet hook, as these factors can significantly influence the look, feel, and size of the hat. A thicker yarn and a larger hook size will yield a larger, warmer hat, while a thinner yarn and a smaller hook will produce a more delicate and snug-fitting hat. For more detailed information on choosing the right crochet hook size, refer to our guide on how to determine crochet hook sizes.
By understanding these basics, you are well on your way to creating your own winter hats. The journey from a ball of yarn to a cozy, stylish hat is filled with opportunities for learning, creativity, and relaxation. So, grab your crochet hook and let's get started!
Understanding Crochet Techniques
In the journey of learning how to crochet winter hats, understanding the essential crochet techniques is a crucial step. In this section, we delve into the key crochet stitches used in making hats and how to measure for the perfect fit.
Crochet Stitches for Hats
Several crochet stitches are suitable for making winter hats, each creating a unique texture and design. Here are some of the most common stitches used:
Single Crochet (SC): This is the most basic crochet stitch and forms a dense, tight fabric that is ideal for winter hats.
Double Crochet (DC): Double crochet stitches create a looser fabric than single crochet, giving the hat more drape.
Half Double Crochet (HDC): This stitch is a hybrid of the single and double crochet, offering a balance between density and flexibility.
Front Post and Back Post Double Crochet (FPDC / BPDC): These stitches create a raised or ribbed pattern, adding texture to the hat.
| Stitch | Description |
|---|---|
| Single Crochet (SC) | Creates a dense, tight fabric. |
| Double Crochet (DC) | Creates a looser fabric with more drape. |
| Half Double Crochet (HDC) | A hybrid of SC and DC, offering balance between density and flexibility. |
| Front Post and Back Post Double Crochet (FPDC / BPDC) | Creates a raised or ribbed pattern, adding texture. |
For a detailed guide on how to create these stitches, refer to our article on how to crochet stitches.
How to Measure for the Perfect Fit
Ensuring your crocheted hat fits perfectly involves taking precise measurements. Here's a simple guide to help:
Head Circumference: Measure around the widest part of the head. This measurement is crucial for determining the size of the hat's base circle.
Hat Height: Measure from the top of the head to the bottom where you want the hat to reach (typically just above the eyebrows for a winter hat). This measurement determines the length of the hat.
| Measurement | Description |
|---|---|
| Head Circumference | Around the widest part of the head, determines the size of the hat's base circle. |
| Hat Height | From the top of the head to the bottom where you want the hat to reach, determines the length of the hat. |
Remember, crochet fabric has some stretch, so aim for a snug fit. Also, different yarns and stitches have different levels of stretch and firmness, so consider making a small swatch to test the stretchiness of your chosen stitch and yarn before beginning your project. This can help ensure a perfect fit for your crocheted winter hat.
Mastering these crochet techniques and understanding how to measure for a perfect fit are significant steps in learning how to crochet winter hats. In the following sections, we'll walk through a step-by-step guide on creating your own crocheted winter hat.
Step-by-step Guide to Crochet a Winter Hat
Mastering how to crochet winter hats is a skill that can prove beneficial for everyone. Not only can you create unique accessories for yourself, but these hats also make wonderful gifts. Let's walk through the process step-by-step.
Starting Your Hat: Making a Magic Ring
The magic ring, also known as the magic circle, is a commonly used technique in crochet. It allows you to start your crocheted piece with a tightly closed center.
- To start, make a loop with your yarn. Hold the loop with the yarn tail on the bottom and the working yarn (the yarn attached to the ball) on top.
- Insert your crochet hook into the loop from front to back and hook the working yarn.
- Pull the working yarn through the loop. You now have one loop on your hook.
- Chain one to secure the loop. You have now created a magic ring.
Remember, the magic ring can be tricky for beginners. Don't get discouraged if it takes a few tries to get it right. For more guidance, refer to our article on how to crochet for beginners.
Working in Rounds to Shape the Hat
Crocheting in rounds is the method used to give your hat its shape. Here's how you can do it:
- Begin with a certain number of stitches in your magic ring. This will depend on the pattern you're following.
- For the next round, increase the number of stitches evenly around the circle. This helps to create a flat circle for the top of the hat.
- Continue increasing for a few rounds until the circle is as wide as the top of your hat.
- Once your hat is as wide as necessary, stop increasing. Simply crochet one stitch in each stitch around until your hat is the desired length.
- Follow your pattern's instructions for finishing the hat.
It's important to note that the pattern will dictate the number of stitches and rounds, type of stitches used, and the increases in each round. For more information on crochet stitches and patterns, check out our article on how to crochet stitches.
Finishing and Adding Details
Once you've reached the desired size and shape of the hat, it's time to finish it off.
- Cut your yarn, leaving a tail of about six inches.
- Yarn over and pull the yarn tail through the loop on your hook. This is known as a slip stitch and will secure your work.
- Weave in your ends using a yarn needle. This means threading the yarn tail through the needle and weaving it in and out of a few stitches to secure it.
- You may choose to add details such as a pom-pom, a flower, or any other embellishments to personalize your hat.
Crocheting a winter hat is a satisfying project that can add a touch of homemade warmth to your winter wardrobe. As you gain more confidence, experiment with different stitches, colors, and patterns for a truly unique creation. Explore our series on how to crochet patterns for hats for more inspiration.
Tips for Crocheting Winter Hats
When learning how to crochet winter hats, several factors can significantly enhance your crocheting experience and the quality of your finished product. This section will provide insights into choosing the right yarn, mastering tension in your stitches, and troubleshooting common issues.
Choosing the Right Yarn
Selecting the most suitable yarn is a crucial step in crocheting winter hats. The material and weight of the yarn you choose can dramatically affect the warmth, comfort, and appearance of your hat.
Material: Wool and acrylic yarns are often preferred for winter hats due to their warmth and durability. Wool is naturally warm and breathable, while acrylic is lightweight and easy to care for.
Weight: The weight of the yarn determines the thickness of the stitches. For winter hats, medium to bulky weight yarns are ideal as they provide more warmth.
Remember, certain yarns may require different care instructions, so always check the yarn label for washing and drying guidelines.
Mastering Tension in Your Stitches
Maintaining consistent tension throughout your project is key to achieving a uniform appearance in your stitches.
Hold the hook and yarn comfortably: Do not hold them too tightly as it can lead to tighter stitches and hand strain.
Practice: Consistency comes with practice. Keep working on your stitches to develop a steady rhythm.
Adjust as needed: Be prepared to adjust your grip and tension as you work through the project.
For more tips on mastering tension, consider checking out our guide on how to crochet for beginners.
Troubleshooting Common Issues
Even experienced crocheters can encounter issues. Here are some common problems and solutions:
Hat is too tight or too loose: Check your gauge. Make sure you're using the correct hook size and not pulling your stitches too tight or leaving them too loose.
Stitches are uneven: This could be due to inconsistent tension. Practice your stitches and try to maintain a consistent grip on your yarn and hook.
Pattern is confusing: Make sure you understand the abbreviations and symbols used in crochet patterns. If you're stuck, our how to crochet stitches guide might be helpful.
Remember, it's okay to make mistakes. Crocheting is a skill that improves with practice. Keep working at it, and soon you'll be creating beautiful winter hats with ease.
Expanding Your Skills
Once you have mastered the basics of how to crochet winter hats, it's time to expand your skills and start adding variations to your creations. Moving beyond the basic hat pattern, you can also explore advanced techniques that will allow you to create more complex patterns.
Adding Variations to Your Hats
Adding variations to your crochet hats can be as simple as changing the stitch pattern or incorporating different colors and textures of yarn. For instance, adding a ribbed brim to your hat can provide a snug fit and a different look. You might also consider adding appliqués, such as crochet flowers or hearts, for a unique touch.
Switching up the yarn color partway through the project can also result in striking designs. Stripes, color blocks, and gradient effects can all be achieved with a little planning.
Another way to add variation is by incorporating different crochet techniques. For instance, you might try using front post and back post stitches to create textured patterns, or experiment with tapestry crochet for multi-color designs.
Advanced Techniques for More Complex Patterns
As you become more comfortable with crocheting, you might want to challenge yourself with more advanced techniques. One such technique is cable crochet, which creates a twisted or braided effect that can add a lot of visual interest to your hats.
Tunisian crochet, also known as Afghan crochet, is another technique that allows for more complex designs. It involves holding several loops on the hook at once, similar to knitting, and can create a variety of intricate patterns.
Fair Isle crochet is a technique that involves changing colors frequently to create detailed, mosaic-like patterns. This technique can be challenging as it requires careful attention to tension and color changes, but the results can be stunning.
C2C (corner to corner) crochet is a unique technique where you start your work in one corner and increase each row diagonally until your project is the desired width and length. This technique works well for graphghans, or afghans that follow a pixel graph.
For more detailed instructions and patterns using these techniques, be sure to check out our articles on how to crochet patterns for hats, how to crochet, and how to crochet stitches.
With these advanced techniques in your arsenal, you'll be well-equipped to take on more complex crochet projects. Don't be afraid to experiment and try new things - that's part of the fun of crocheting! Whether you're adding variations to your hats or tackling more complex patterns, remember to take your time, practice, and most importantly, enjoy the process.